Building a reusable Hero Banner Component in Sitecore AI using Next.js and GraphQL
Monday, July 6, 2026
Summary
One of the advantages of Sitecore AI is its headless architecture, where content is completely separated from presentation. By combining Next.js, the Sitecore Content SDK, and GraphQL Rendering Contents Resolver, we can build highly reusable and editor-friendly components.
In this article, I’ll walk through how I created a reusable Hero Banner component that retrieves its datasource content using a GraphQL query and renders it in a Next.js application.
By the end of this tutorial, you’ll have:
A reusable React presentation component
A Sitecore wrapper component
TypeScript interfaces for GraphQL data
A GraphQL rendering query
A rendering item configured in Sitecore AI
Architecture Overview
The component is divided into four layers:
This separation keeps the presentation layer independent from Sitecore-specific logic.
Step 1: Create the Presentation Component
Create a presentation component (HeroBanner.tsx) that is responsible only for rendering the UI. Its responsibilities include:
Rendering the hero image
Displaying the title
Displaying the headline
Displaying the sub-copy
interface HeroBannerProps {
    title?: string | React.JSX.Element;
    image?: React.JSX.Element;
    headline?: string | React.JSX.Element;
    subcopy?: string | React.JSX.Element;
}

export const HeroBanner: React.FC<HeroBannerProps> = ({
  title,
  image,
  headline,
  subcopy,
}) => {
    return (
    <section className="module-hero-banner">
      <div className="hero_banner">
        <div aria-hidden="true" className="hero-image">
          {image}
        </div>
          <div className="l-row l-row--h-center">
            <div className="l-col-10">
              <div className="hero-content">

                {title && (
                  <h1 className="hero-title">{headline}</h1>
                )}
                {headline && (
                  <h2 className="hero-headline">{headline}</h2>
                )}
                {subcopy && (
                  <div className="hero-subcopy">{subcopy}</div>
                )}
              </div>
            </div>
          </div>
      </div>
    </section>
  );
};
The component itself has no dependency on Sitecore, making it reusable across applications. It keeps the presentation layer independent from the data source, allowing the same components to be reused even if the backend or CMS changes. Meaning, nothing inside the component assumes Sitecore exists. you can use it in:
another Next.js application
a plain React SPA
Storybook
any other CMS
data coming from REST
a mocked or static data during development. etc
Define GraphQL Types
Next, create strongly typed interfaces for the GraphQL response (HeoBannerType.ts).
export interface HeroBannerGqlData {
    title: { jsonValue: Field<string> } | null;
    image: { jsonValue: ImageField } | null;
    headline: { jsonValue: Field<string> } | null;
    subCopy: { jsonValue: Field<string> } | null;
}
The wrapper component receives these fields through:
export type HeroBannerScProps = {
  fields: {
    data: {
      heroBannerData: HeroBannerGqlData | null;
    };
  };
};
Using TypeScript provides compile-time validation and better IntelliSense while developing.
Step 2: Create the Sitecore Wrapper Component
Create a wrapper component (HeroBanner-sc-wrapper.tsx) That bridges Sitecore data and the React presentation component. It performs several important tasks:
Reads GraphQL response data
Detects Experience Editor mode
Renders Sitecore field helpers
Displays a placeholder if no datasource is configured
First, determine whether the page is in editing mode:
const isEditing = props.page?.mode?.isEditing ?? false;Retrieve the GraphQL response:
const data = props.fields?.data?.heroBannerData;If no datasource is configured, display a friendly message:
if (!data) {
    return (
        <div className="component image-cta">
            HeroBanner content not configured.
        </div>
    );
}
This makes it obvious to content authors that a datasource still needs to be assigned.
Instead of rendering raw values directly, use the Sitecore Content SDK components.
Text fields:
<Text field={data.headline?.jsonValue} />Rich text:
<RichText field={data.subCopy?.jsonValue} />Images are rendered using a custom image component.
<NextImageExtended field={data.image?.jsonValue} />This keeps all Sitecore-specific logic isolated from the presentation layer.
Experience Editor Support
One of the biggest benefits of using the Sitecore Content SDK components is support for Experience Editor. We can conditionally render it as
data.headline?.jsonValue?.value || isEditingThis ensures that empty fields still render editable placeholders while authors are editing pages. Without this check, empty fields would disappear from the Experience Editor.
Putting it all together:const HeroBannerScComponent = (
props: HeroBannerScProps,
): React.JSX.Element => {
const isEditing = props.page?.mode?.isEditing ?? false;
const data = props.fields?.data?.heroBannerData;
if (!data) {
return (
<div className="component image-cta">
HeroBanner content not configured.
</div>
);
}
return (
<HeroBanner
title={
data.title?.jsonValue?.value || isEditing ? (
<Text field={data.title?.jsonValue} />
) : undefined
}
image={
data.image?.jsonValue?.value?.src || isEditing ? (
<NextImageExtended field={data.image?.jsonValue} />
) : undefined
}
headline={
data.headline?.jsonValue?.value || isEditing ? (
<Text field={data.headline?.jsonValue} />
) : undefined
}
subcopy={
data.subCopy?.jsonValue?.value || isEditing ? (
<RichText field={data.subCopy?.jsonValue} />
) : undefined
}
/>
);
};Step 3 & 4: Create the Rendering Item and add GraphQL Rendering Query
Inside Sitecore AI:
Create a Rendering item.
Associate it with the Next.js component.
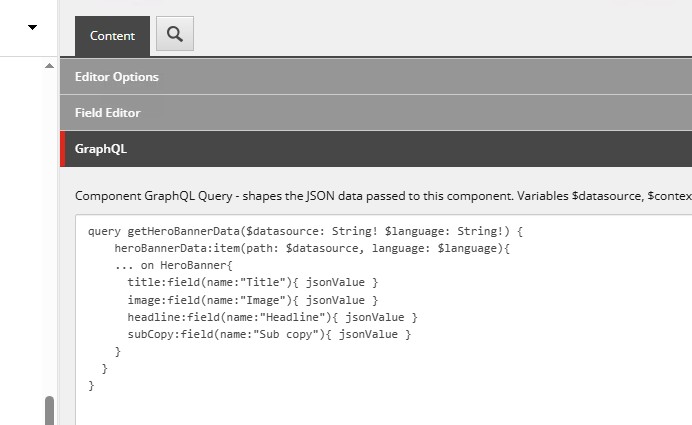
Configure the GraphQL query shown below.
Set the datasource template to HeroBanner. A template that has the fields image, title, headline and sub copy.
query getHeroBannerData($datasource: String! $language: String!) {
  heroBannerData:item(path: $datasource, language: $language){
    ... on HeroBanner{
      title:field(name:"Title"){ jsonValue }
      image:field(name:"Image"){ jsonValue }
      headline:field(name:"Headline"){ jsonValue }
      subCopy:field(name:"Sub copy"){ jsonValue }
    }
  }
}
The query retrieves:
Title
Image
Headline
Sub Copy
Each field is returned as a jsonValue, allowing the Sitecore Content SDK components to render them correctly.
When authors add the rendering to a page, Sitecore automatically executes the GraphQL query and passes the response to the wrapper component.
Benefits of this Approach
Separating the component into presentation and Sitecore wrapper layers provides several advantages:
Cleaner architecture
Reusable React components
Strong TypeScript typing
Better maintainability
Full Experience Editor support
GraphQL-driven content retrieval
Easier unit testing
Output:

Final Thoughts
This pattern has become my preferred approach for building reusable components in Sitecore AI.
The presentation component focuses purely on UI, while the wrapper component handles Sitecore-specific concerns such as GraphQL data, editing mode, and field rendering. This separation keeps the codebase cleaner, easier to maintain, and highly reusable.
As your component library grows, following this pattern consistently makes it much easier to scale your Next.js solution while giving content authors the rich editing experience they expect from Sitecore AI.